
Spring 게시판 프로젝트 9편 (Oauth2 적용)
Created Time: August 10, 2022 2:33 PM
Last Edited Time: October 25, 2022 11:31 PM
References: https://velog.io/@swchoi0329/%EC%8A%A4%ED%94%84%EB%A7%81-%EC%8B%9C%ED%81%90%EB%A6%AC%ED%8B%B0%EC%99%80-OAuth-2.0%EC%9C%BC%EB%A1%9C-%EB%A1%9C%EA%B7%B8%EC%9D%B8-%EA%B8%B0%EB%8A%A5-%EA%B5%AC%ED%98%84
https://deeplify.dev/back-end/spring/oauth2-social-login
Tags: Java, Spring, Computer
왜?
로그인시에 구글계정을 통해 내 서비스에서 로그인하는 것을 구현하고싶었다.
현 상황은?
리프레쉬 토큰을 활용하지 않고, access token으로만 인증 처리를 하고있다. 따라서 refresh token을 사용하지 않고, OAuth2.0을 적용하는 것이 관건이였다.
스프링 시큐리티+OAuth 2.0
스프링 시큐리티(Spring Security)는 막강한 인증과 인가(혹인 권한 부여) 기능을 가진 프레임워크 사실상 스프링 기반의 애플리케이션에서는 보안을 위한 표준
스프링 시큐리티와 스프링 시큐리티 Oauth2클라이언트
OAuth
오픈 아이디의 표준적인 방법을 고려하던 사람들은 OAuth 라는 규격을 만들고 2007년 10월 03일 OAuth 1.0 을 발표하게 되었습니다.
이휴 OAuth 2.0까지 발전하였다.
로직

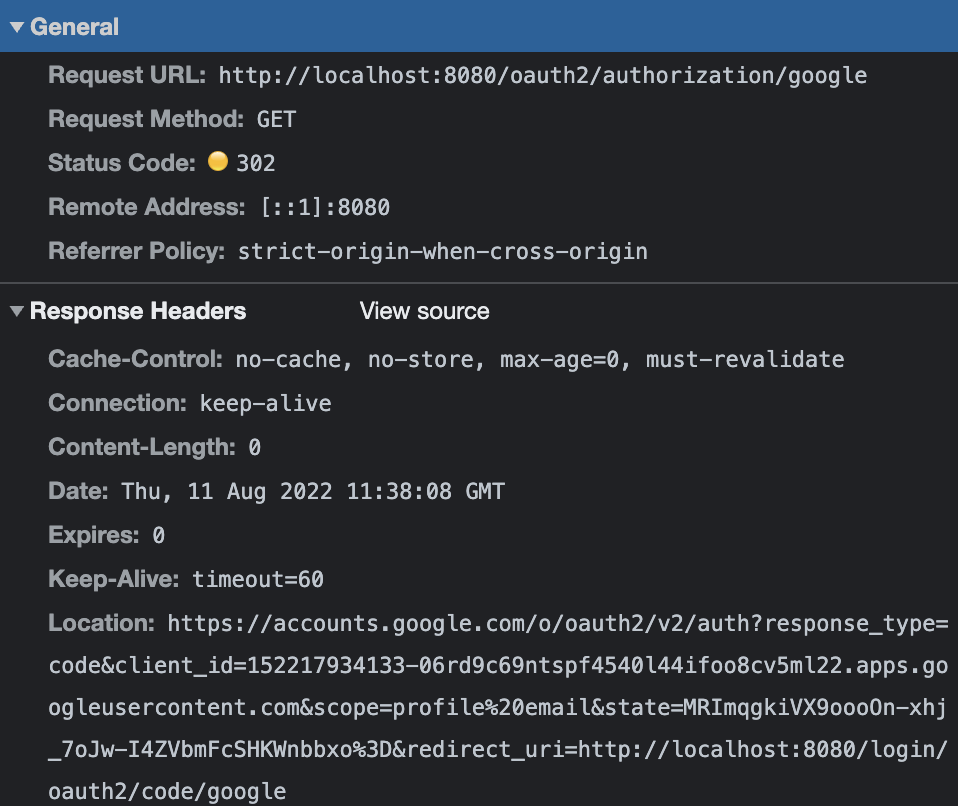
$1. 클라이언트→내 서버 OAuth2지정로 지정된 요청
2. 내 서버→클라이언트 redirect_uri주소를 담은 응답으로 redirect 302를 주며 Authorization Server로 redirect 시킴
쿼리로redirect_uri=http://localhost:8080/login/oauth2/code/google 담고있음
3.클라이언트→Authorization Server 리다이렉트로 로그인성공할 경우, Authorization Server→내 서버에 Authorization Code Response로 응답
4. 내 서버→ Authorization Server 요청시 Access Token Request With Authorization Code
5. Authorization Server→내 서버 Access Token을 응답함
6. 내서버→ Resource Server에 User Info with Access Token으로 요청함
7. ResourceServer→ 내서버 UserInfo응답함
8. 내 서버에서의 처리
- user info를 DB저장
- jwt accesstoken 발급
9. 내 서버→클라이언트에게 서버가 원하는 주소로 redirect로 시킴( 내서버의 access-token 값 전달!)
redirect query에 accesstoken포함
그림엔 나오지 않았지만, 3번에 클라이언트→Authorization Server로 요청에 대해 다시한번 리다이렉트가 오며, 이때 아래 그림에 해당하는 주소가 내 서버이므로 요청 보낸 후 내서버의 응답을 기다리게된다. 그리고 9번에서 설명하는 spring에서 원하는 값을 redirect형식으로 응답하게 된다면, 결국 클라이언트→해당주소로 요청하게된다(10번 참조)(혹시나, spring에서 응답을 하지않을경우 이 요청이 만료된다)
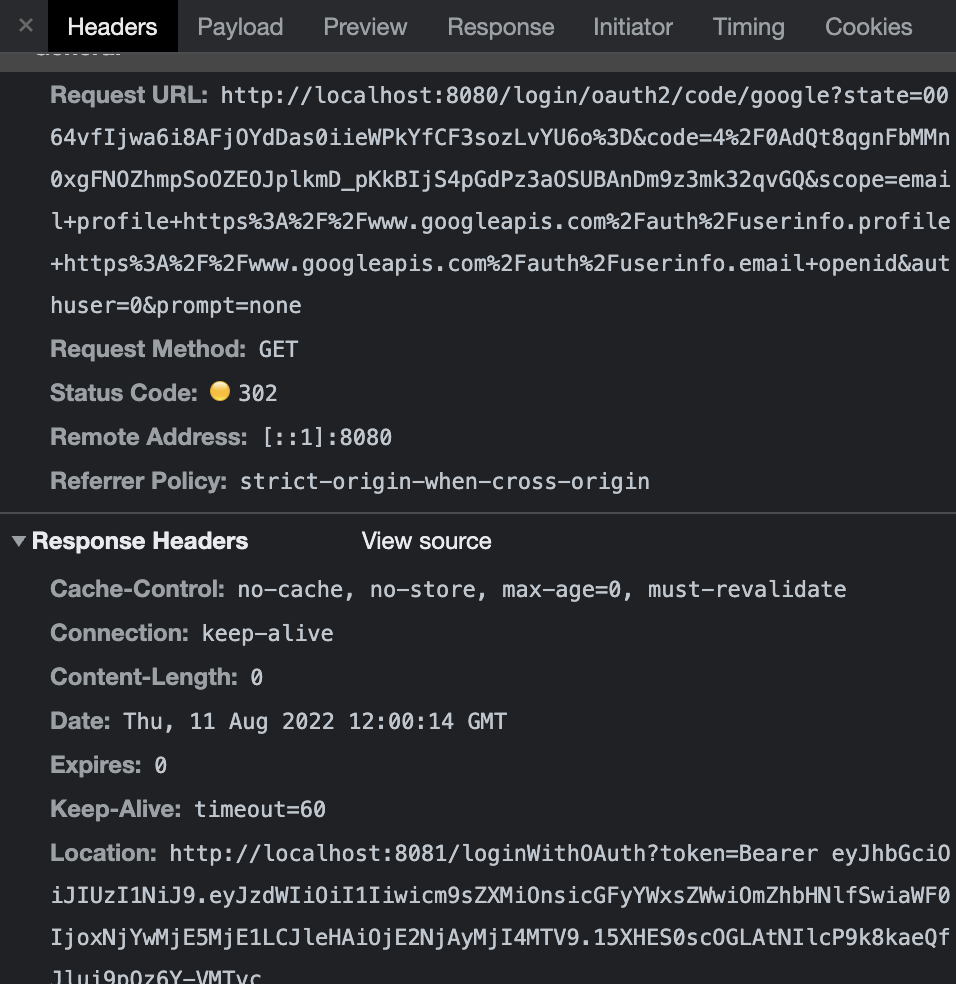
10. 9번 클라이언트는 해당주소로 요청,이후 localStorage에 accesstoken을 갖게됨.
- 해당 리다이렉트 주소로 요청후 200을 받게된다
- redirect된 링크에 요청을 보낼때 uri에 query에는 access-token값이 있으므로 vue에서 링크에 해당하는 페이지가 created()될때 vue에서 localStorage에 저장하게만듬
- 이후 프론트 백엔드 간의 요청은 accesstoken 인증가능함
구현
구글 서비스 등록
구글 서비스에 신규 서비스를 생성. 여기서 발급된 인증 정보(clientId와 clientSecret)를 통해 로그인 기능과 소셜 서비스 기능을 사용할 수있으니 무조건 발급 받고 시작한다.
https://deeplify.dev/back-end/spring/oauth2-social-login
위에 링크를 참조하자
마지막 OAuth 클라이언트를 생성하고 나면 클라이언트 ID와 클라이언트 보안 비밀번호를 얻을수있으며, 이 id와 secret은 스프링 OAuth설정시 사용되므로 잘 복사해줘야한다.
Spring 구현
apllication-oauth.properties
1 | spring.security.oauth2.client.registration.google.client-id=클라이언트 ID |
- scope=profile,email
- 많은 예제에서는 이 scope를 별도로 등록하지 않고 있습니다.
- 기본값이 openid,profile,email이기 때문입니다.
- 강제로 profile,email를 등록한 이유는 openid라는 scope가 있으면 Open id Provider로 인식하기 때문입니다.
- 이렇게 되면 Open id Provider인 서비스(구글)와 그렇지 않은 서비스(네이버/카카오 등)로 나눠서 각각 OAuth2Service를 만들어야 합니다.
- 하나의 OAuth2Service로 사용하기 위해 일부러 openid scope를 빼고 등록합니다.
application.properties추가
1 | spring.profiles.include=oauth |
.gitignore 에 추가
1 | application-oauth.properties |
스프링 스큐리티 설정
먼저 build.gradle에 스프링 시큐리티 관련 의존성 하나 추가한다.
1 | //spring-boot-starter-oauth2-client와 spring-security-oauth2-jose를 기본으로 관리함 |
- spring-boot-starter-oauth2-client
- 소셜 로그인 등 클라이언트 입장에서 소셜 기능 구현 시 필요한 의존성
- spring-boot-starter-oauth2-client와 spring-security-oauth2-josn를 기본으로 관리해줍니다.
build.gradle 설정이 끝났으면 OAuth 라이브러리를 이용한 소셜 로그인 설정 코드를 작성합니다.
- config 패키지 생성
- 시큐리티 관련 클래스는 모두 이곳에 생성한다.
SecurityConfig 클래스 생성
OAuth2로그인 기능, endpoint로 소셜 로그인 성공시 후속 조치를 진행할 UserService 인터페이스의 구현체를 등록한다.
리소스 서버(즉, 소셜 서비스들)에서 사용자 정보를 가져온 상태에서 추가로 진행하고자 하는 기능을 명시할수있다.
또한, 모든 처리후 successHandler를 지정해줌으로써, 핸들러에서 targeturl지정 access-token발급 및 redirect 유도
1 | protected void configure(HttpSecurity http) throws Exception { |
CustomOAuth2UserService 생성
- 구글 로그인 이후 가져온 사용자의 정보(email.name 등) 들을 기반으로 가입 및 정보수정, 세션 저장등의 기능을 지원한다.
1 |
|
OAuthattributes
OAuth에서 가져온 attributes를 받는 DTO역할을 한다.
OAuth2UserService를 통해 가져온 OAuth2User의 attribute를 담을 클래스
- of()
- OAuth2User에서 반환하는 사용자 정보는 Map이기 때문에 값 하나하나를 변환해야만 합니다.
- toEntity()
- User 엔티티를 생성합니다.
- OAuthAttributes에서 엔티티를 생성하는 시점은 처음 가입할 때입니다.
- 가입할 때의 기본 권할을 GUEST로 주기 위해서 role 빌더값에는 Role.GUEST를 사용합니다.
- OAuthAttributes 클래스 생성이 끝났으면 같은 패키지에 SessionUser 클래스를 생성합니다.
1 |
|
OAuth2AuthenticationSuccessHandler
access token 값과 refresh token 전달 역할
결국 oauth가 끝난후, session에… refresh token을 넣어줘야하는구나…
쿠키를 이용하지 않으면 구현이 불가능??
결국에 직접 redirect를 해당 요청자에게 전달해줘야하고, 이떄 successHandler와 failureHandler를 구현하여, 성공시 DB에는 refreshToken을 저장하고 UriComponentsBuilder 로 token값으로 queryparam를 통해 access token값을주고, cookie도 refresh token을 넣어줌
1 |
|
Front-end vue
로직
- 요청을 Google Login 클릭시 해당 서버로 요청 보내도록함
<a href="http://localhost:8080/oauth2/authorization/google" class="btn btn-success active" role="button">Google Login</a>
router
1 | import LoginWithOAuth from "@/views/auth/LoginWithOAuth"; |
LoginWithOAuth.vue
- OAuth로 로그인시 accesstoken값이 query로 들어옴에 따라 이것이 있다면, board/list 로 이동// 없다면 login페이지로 이동
- accesstoken값은 localStorage에 저장
1 | <template> |
오류 해결
Authorization_request_not_found
- 나같은 경우, authentication에서 추출하여 해당 email을 가진 user가 없을시 userrepository.save()를 할때, User 모델에서 nullable=false 필드인 nickname 필드가 null이였으므로, 오류가 났고, 이는 다시 처음부터 일어나는 현상이 생김 반복하다가 결국에, 마지막에 뜨는 오류였다.
해결
해당 필드 null 가능하도록 제약 조건 삭제함
access_token과 refresh_token이 둘다 필요한 이유
https://stackoverflow.com/questions/3487991/why-does-oauth-v2-have-both-access-and-refresh-tokens
(???) 읽어보고 다음 이슈로 해결하기
cannot be cast to class
authentication.getPrincipal()
을 활용하여, 현재 인증한 계정에 대해서 email계정을 얻어오기위해 (User)로 형변환시도하다 위와같은 에러가 나왔다.
해결책
debug에서 authentication.principal은 {DefaultOAuth2User@14764}였고, 이는 DefaultOAuth2User 객체였다. 따라서 형변환시에는 종속관계에 User가 없엇으므로 cannot be cast to class가 떴던것이다.
이는 CustomOAuth2UserService에서 loadUser를 통해 OAuth2User의 상속인 DefaultOAuth2User 의 객체를 반환했기때문이다.
따라서 DefaultOAuth2User로 형변환 성공하였다.