LostCatBox

Advenced-JPA1-CH01

Word count: 693Reading time: 4 min
2023/05/08 Share

JPA 실전 1편

기본 설정

  • gradle 파일
    • java 11
    • Springbok 2.7.11
1
2
3
4
5
6
7
8
9
10
11
12
13
14
15
16
17
18
19
20
21
22
23
24
25
26
27
28
29
30
31
32
33
34
35
36
37
38
plugins {
id 'java'
id 'org.springframework.boot' version '2.7.11'
id 'io.spring.dependency-management' version '1.0.15.RELEASE'
}

group = 'jpabook'
version = '0.0.1-SNAPSHOT'
sourceCompatibility = '11'

configurations {
compileOnly {
extendsFrom annotationProcessor
}
}

repositories {
mavenCentral()
}

dependencies {
implementation 'org.springframework.boot:spring-boot-starter-data-jpa'
implementation 'org.springframework.boot:spring-boot-starter-validation'
implementation 'org.springframework.boot:spring-boot-starter-thymeleaf'
implementation 'org.springframework.boot:spring-boot-starter-web'
compileOnly 'org.projectlombok:lombok'
runtimeOnly 'com.h2database:h2'
annotationProcessor 'org.projectlombok:lombok'
testImplementation 'org.springframework.boot:spring-boot-starter-test'
//JUnit4 추가
testImplementation("org.junit.vintage:junit-vintage-engine") {
exclude group: "org.hamcrest", module: "hamcrest-core"
}
}

test {
useJUnitPlatform()
}

의존성 파악 및 핵심 라이브러리

  • 의존성 파악은 ./gradlew dependencies —configuration compileClasspath 또는 intellij의 gradle 참조
  • 핵심 라이브러리
    • 스프링 MVC
    • 스프링 ORM
    • JPA, 하이버네이트
    • 스프링 데이터 JPA
  • 기타 라이브러리
    • H2 데이터베이스 클라이언트
    • 커넥션 풀: 부트 기본은 HikariCP
    • WEB(thymeleaf)
    • 로깅 SLF4J & LogBack
    • 테스트

thymeleaf 기본 사용법

꿀팁

  • build.gradle에서 devtools 이용하면, 특정 파일만 recompile가능! 빠르다!
1
implementation 'org.springframework.boot:spring-boot-devtools'

사용법

1
<p th:text="'안녕인간' + ${data}">안녕하세요. 손님</p>

h2 database

  • spring과 맞는 h2 database 버전 쓰기
  • https://www.h2database.com
    • 다운로드 및 설치 데이터베이스 파일 생성 방법
    • jdbc:h2:~/jpashop (최소 한번)
    • ~/jpashop.mv.db 파일 생성 확인
    • 이후 부터는 jdbc:h2:tcp://localhost/~/jpashop 이렇게 접속
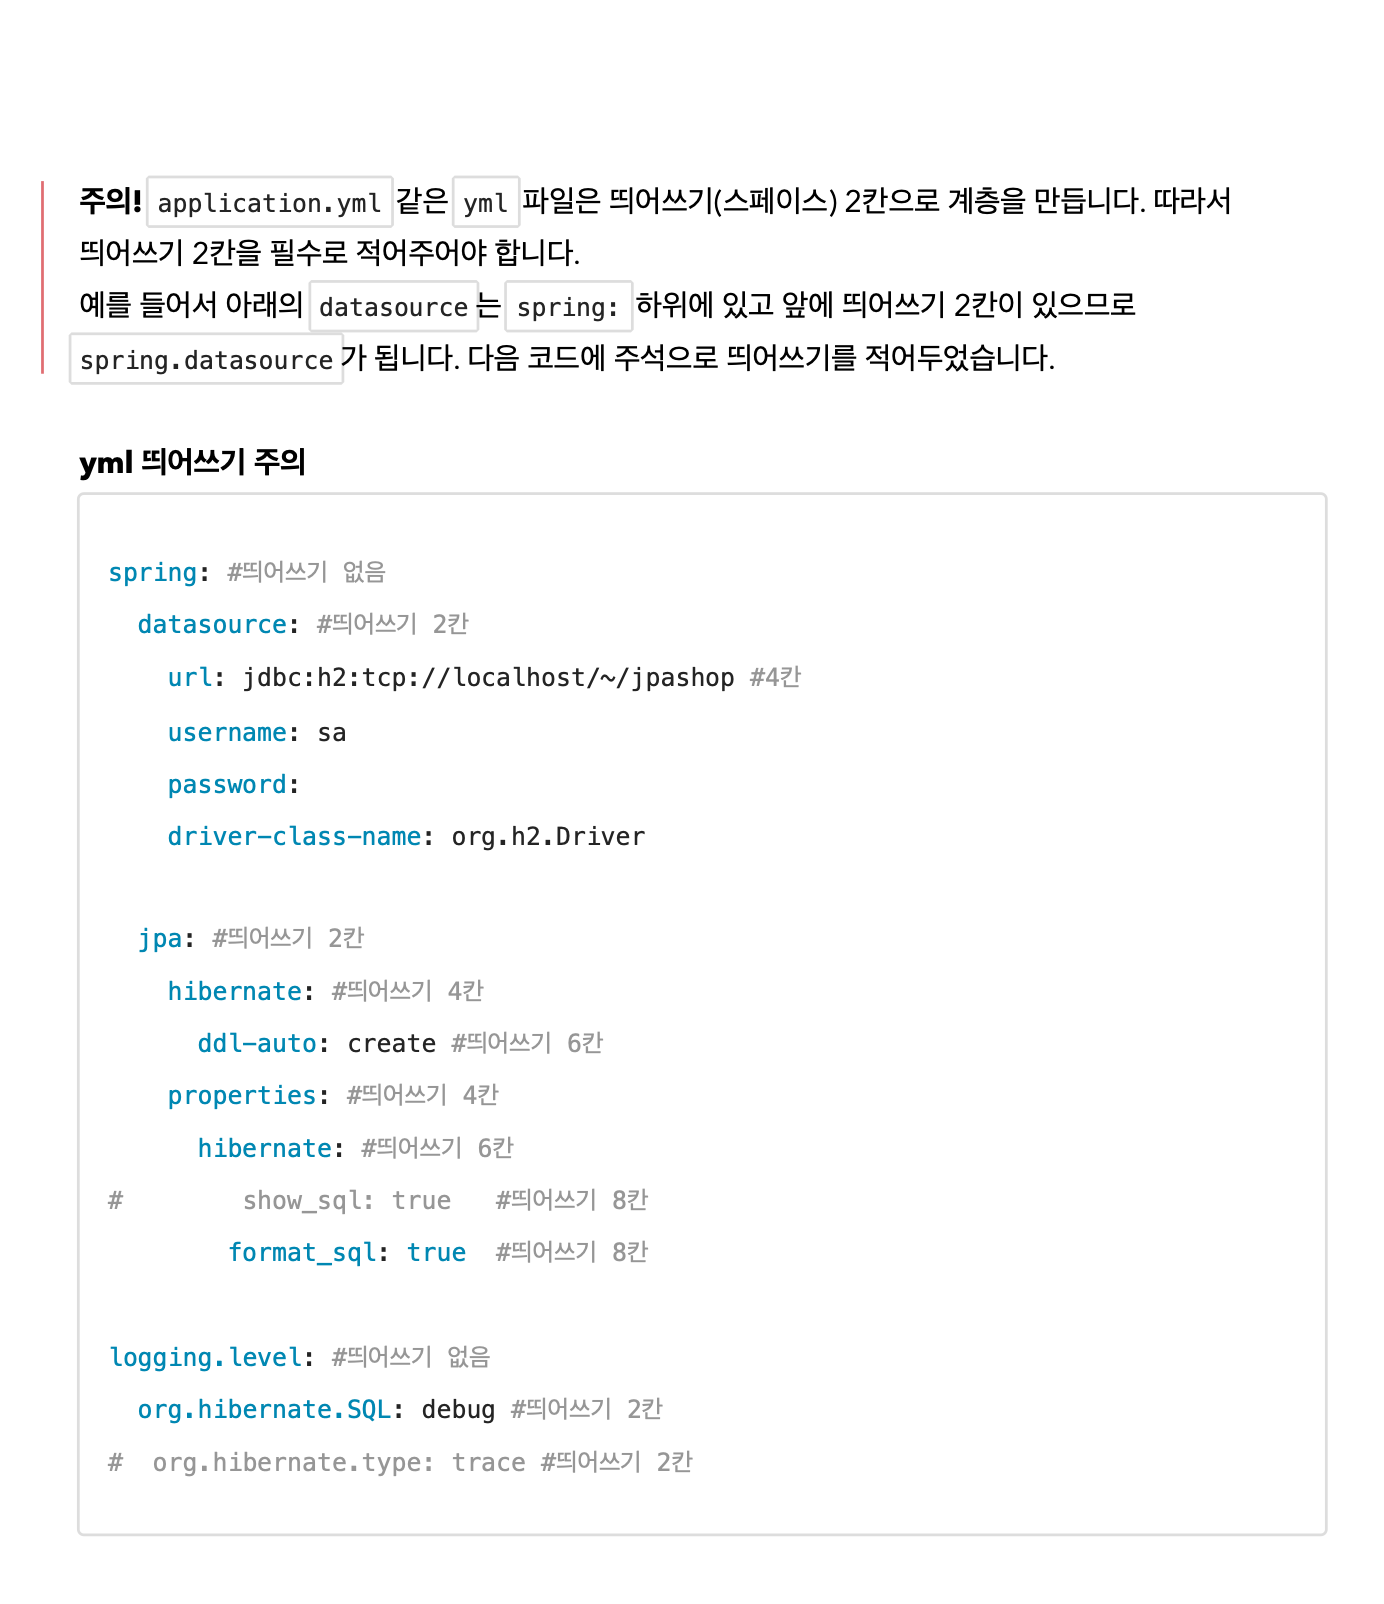
jpa 설정

  • Application.yml
1
2
3
4
5
6
7
8
9
10
11
12
13
14
15
16
17
spring:
datasource:
url: jdbc:h2:tcp://localhost/~/jpashop;MVCC=TRUE
username: sa
password:
driver-class-name: org.h2.Driver

jpa:
hibernate:
ddlAuto: create
properties:
show_sql: true #시스템 out으로 hibernate의 sql문 표시. 실무 X
format_sql: true

logging:
level:
org.hibernate.SQL: debug # logger를 통해 hibernate의 sql문 표시. 실무 사용!
  • 참고로 data-jpa 라이브러리를 사용하므로 자동적으로 entity manager factory는 자동으로 생성되므로 entitymanager는 주입받아서 사용

    1
    2
    3
    4
    5
    6
    7
    @Repository
    public class MemberRepository {

    @PersistenceContext
    private EntityManager em;

    }
  • Member entity

1
2
3
4
5
6
7
8
@Entity
@Getter
@Setter
public class Member {
@Id @GeneratedValue
private Long id;
private String username;
}
  • Member Test(!!!)
    • JPA 원칙. 하나의 트랜잭션안에서 하나의 엔티티는 동일성 보장
1
2
3
4
5
6
7
8
9
10
11
12
13
14
15
16
17
18
19
20
21
22
23
24

@RunWith(SpringRunner.class)
@SpringBootTest
class MemberRepositoryTest {

@Autowired
MemberRepository memberRepository;

@Test
@Transactional
public void testMember() throws Exception {
//given
Member member = new Member();
member.setUsername("memberA");
//when
Long saveId = memberRepository.save(member);
Member findMember = memberRepository.find(saveId);
//then
Assertions.assertThat(findMember.getId()).isEqualTo(member.getId());
Assertions.assertThat(findMember.getUsername()).isEqualTo(member.getUsername());
//결과는 당연히 같다. 하나의 트랜잭션안에서(=같은 영속성 컨텍스트) 같은 entity로 식별되므로 생성, 조회하면 모두 같아야하는 원칙
Assertions.assertThat(findMember).isEqualTo(member); //true
}
}

yml파일 만들떄 참조

스크린샷 2023-05-09 오전 12.03.45

JPA persistence.xml 파일 필요없다

  • 참고:스프링부트를 통해 복잡한설정이 다 자동화되었다.
  • persistence.xml 도 없고, LocalContainerEntityManagerFactoryBean 도 없다.
  • 스프링 부트를 통한 추가 설정은 스프링 부트 메뉴얼을 참고하고, 스프링 부트를 사용하지 않고 순수 스프링과 JPA 설정 방법은 자바 ORM 표준 JPA 프로그래밍 책을 참고하자.

쿼리 파라미터 로그 남기기(!!!)

주의! 스프링 부트 3.x를 사용한다면 영상 내용과 다르기 때문에 다음 내용을 참고하자.

  • 로그에 다음을 추가하기: SQL 실행 파라미터를 로그로 남긴다.
  • 스프링 부트 2.x, hibernate5 org.hibernate.type: trace
  • 스프링 부트 3.x, hibernate6 org.hibernate.orm.jdbc.bind: trace

외부 라이브러리 사용

https://github.com/gavlyukovskiy/spring-boot-data-source-decorator

스프링 부트를 사용하면 이 라이브러리만 추가하면 된다.

1
implementation 'com.github.gavlyukovskiy:p6spy-spring-boot-starter:1.5.6'
  • 참고: 쿼리 파라미터를 로그로 남기는 외부 라이브러리는 시스템 자원을 사용하므로, 개발 단계에서는 편하게 사용해도 된다. 하지만 운영시스템에 적용하려면 꼭 성능테스트를 하고 사용하는 것이 좋다.

쿼리 파라미터 로그 남기기 - 스프링 부트 3.0

p6spy-spring-boot-starter 라이브러리는 현재 스프링 부트 3.0을 정상 지원하지 않는다. 스프링 부트 3.0에서 사용하려면 다음과 같은 추가 설정이 필요하다.

1. org.springframework.boot.autoconfigure.AutoConfiguration.imports 파일 추가

1
2
3
4
src/resources/META-INF/spring/
org.springframework.boot.autoconfigure.AutoConfiguration.imports
com.github.gavlyukovskiy.boot.jdbc.decorator.DataSourceDecoratorAutoConfigurati
on

폴더명: src/resources/META-INF/spring
파일명: org.springframework.boot.autoconfigure.AutoConfiguration.imports

2. spy.properties 파일 추가 src/resources/spy.properties

1
appender=com.p6spy.engine.spy.appender.Slf4JLogger

이렇게 2개의 파일을 추가하면 정상 동작한다.

CATALOG
  1. 1. JPA 실전 1편
    1. 1.1. 기본 설정
      1. 1.1.1. 의존성 파악 및 핵심 라이브러리
    2. 1.2. thymeleaf 기본 사용법
      1. 1.2.1. 꿀팁
      2. 1.2.2. 사용법
      3. 1.2.3. h2 database
  2. 2. jpa 설정
    1. 2.0.1. yml파일 만들떄 참조
    2. 2.0.2. JPA persistence.xml 파일 필요없다
  3. 2.1. 쿼리 파라미터 로그 남기기(!!!)
    1. 2.1.1. 외부 라이브러리 사용
    2. 2.1.2. 쿼리 파라미터 로그 남기기 - 스프링 부트 3.0