Spring 게시판 프로젝트 10편 (각종 이슈들 개선점 정리) Created Time: August 19, 2022 1:19 AM
왜? 프로젝트의 부족한 부분들이 많이 보임
보안관련 이슈 등등
logout 구현 구현
1
2
3
4
5
.logout() .logoutUrl("/logout" ) .clearAuthentication(true ) .invalidateHttpSession(true ) .and()
문제점
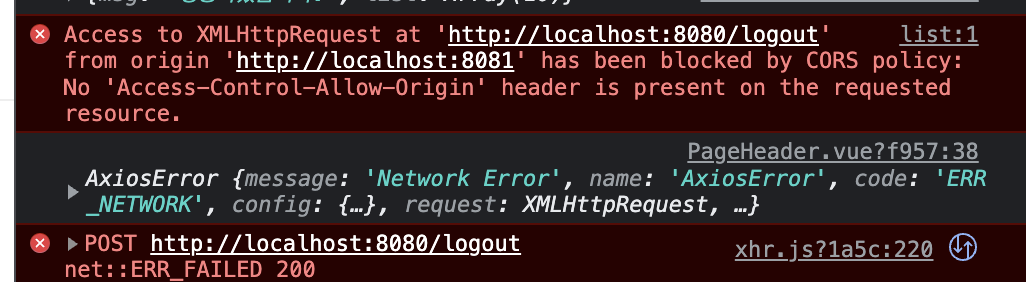
logout을 method:post 를 요청할때 CORS이슈가 터졌다.
분명 logout을 method:post로 동작하였다
하지만 계속해서 CORS이슈가 터졌다.
이유? CORS는 결국 헤더에 allowedHeader가 적혀있지 않은 response를 받아서 브라우져에서 경고를 띄우는것이다.
원인은 바로 SecurityConfig에서 logout()을 설정해놓았고 logout()이 성공하면 자동으로 logoutsuccessurl()을 통해 자동으로 redirect가 되기때문이다. 하지만 이 redirect가 되는 페이지는 allowedHeader 옵션이 없었기 때문에 CORS이슈가 터진것이다.
해결책 생각해볼수있는 해결책은 두가지다
logoutSuccessHandler를 활용하는 방법(이는 logoutsuccessurl()이 동작하지않음).logoutSuccessHandler((new HttpStatusReturningLogoutSuccessHandler(HttpStatus.*OK*)))
새로이 LogoutSuccessHandler(allow-origin정보를 넣어주는역할)를 만들어주고,.logoutSuccessHandler((new MyLogoutSuccessHandler()))커스텀 successhadler호출
1 2 3 4 5 6 7 8 public class MyLogoutSuccessHandler implements LogoutSuccessHandler @Override public void onLogoutSuccess (HttpServletRequest request, HttpServletResponse response, Authentication authentication) throws IOException, ServletException { response.setHeader("Access-Control-Allow-Origin" , "*" ); } }
PostResponseDto제거 PostResponseDto는 comments를 함께 해당post 인스턴스를 view를 render할때쓰는 model에 넣어 한번에 전달하기위해 활용했지만, front-end와 backend를 나눠서 posts와 comments에 각각 요청을 하게 되었고, 따라서 PostResponseDto를 PostDto로 모두 전환후 PostResponseDto는 해당 프로젝트에서 제거하였다.
1 2 3 4 5 private List<CommentDto> comments;this .comments = post.getComments().stream().map(CommentDto::new ).collect(Collectors.toList());
HttpStatus 알맞게 조정 client 에서는 server error인 500을 보게 해서는 안되는데, 나는 모든 에러를 모두 500대로 하고있었다.
각각 HttpStatus에 알맞게
400 Bad Request
401 권한 오류 (적당한 권한을 가진애로가져와라
403 숨기고싶은것 (금지된항목, 권한으로 해결되지않은 항목)
404 NotFound(API에서 공개하지않았고, 찾아지지 않았을때 보여주느것)
등으로 각자 알맞게 사용하여 변경하였다
https://stackoverflow.com/questions/1959947/whats-an-appropriate-http-status-code-to-return-by-a-rest-api-service-for-a-val
Server Side 이슈 처리
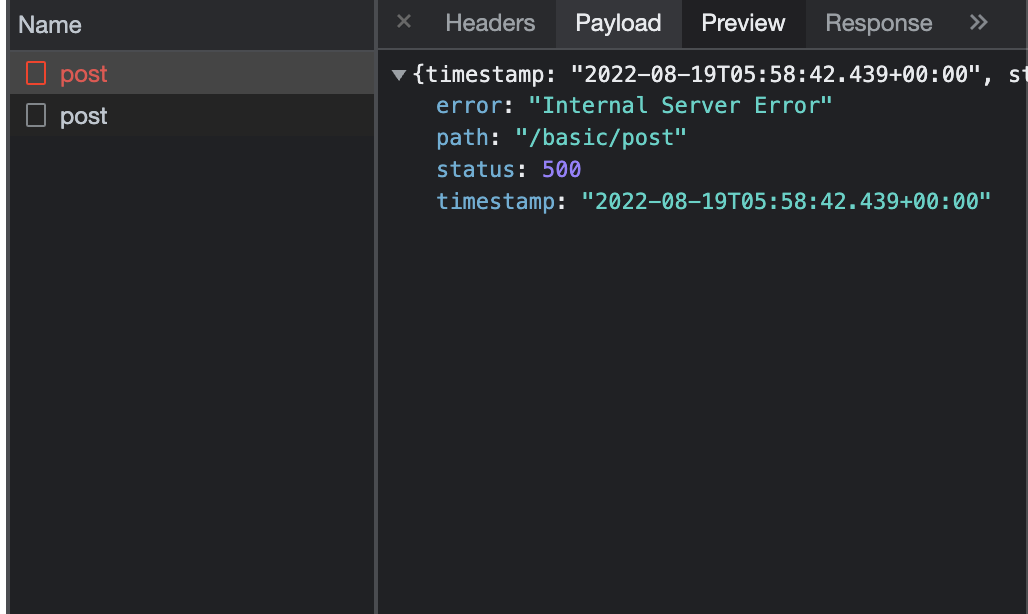
문제점
post를 등록시 10자이상의 제목을 입력시 DB의 스펙과 맞지않으므로 sql error가 뜨면서 httpstatus 500 응답되었다.
해결법 Client의 데이터는 조작이 쉬울 뿐더러 모든 데이터가 정상적인 방식으로 들어오는 것도 아니기 때문에, Client Side뿐만 아니라 Server Side에서도 데이터 유효성을 검사해야 할 필요가 있다.
따라서 기본적으로 post, comment에 대해서 validation처리를 할 필요가있었다.
스프링부트 프로젝트에서는 @validated
@ValidatedControllerBindingResult
아래는 예시다.
1 2 3 4 5 6 7 8 9 10 11 12 13 14 15 16 17 18 19 20 21 22 @PostMapping public ResponseEntity<?> createUSer(@Validated @RequestBody final UserCreateRequestDto userCreateRequestDto, BindingResult bindingResult){ if (bindingResult.hasErrors()) { List<String> errors = bindingResult.getAllErrors().stream().map(e -> e.getDefaultMessage()).collect(Collectors.toList()); return ResponseEntity.ok(new ErrorResponse("404" , "Validation failure" , errors)); } try { final User user = userService.searchUser(userCreateRequestDto.toEntity().getId()); }catch (Exception e){ return ResponseEntity.ok( new UserResponseDto(userService.createUser(userCreateRequestDto.toEntity())) ); } return ResponseEntity.ok( new UserResponseDto(userService.searchUser(userCreateRequestDto.toEntity().getId())) ); }
내가 활용한 방법
controller에서 post @validated 선언 Dto로 전환과정에서 에러시 bindingResult에서 hasErrors() 있을때 CustomException만들어서 보냄
1 2 3 4 5 6 7 8 public SingleResult<PostDto> create (@Validated @RequestBody PostDto postDto, BindingResult bindingResult) if (bindingResult.hasErrors()){ List<String> errors = bindingResult.getAllErrors().stream().map(e->e.getDefaultMessage()).collect(Collectors.toList()); throw new DataFieldInvalidCException(errors); } String email = getCurrentUserEmail(); return responseService.getSingleResult(postService.savePost(email, postDto)); }
PostDto
@size(max=10) 등등 다양한 기능을 validation으로 활용할수있다. 에너테이션 찾아보기
1 2 3 4 5 6 7 8 9 10 11 12 13 14 15 16 17 18 19 20 21 22 23 24 25 26 27 28 29 30 31 32 33 34 35 36 37 38 39 40 41 42 43 44 package hello.postpractice.domain;import com.sun.istack.NotNull;import lombok.*;import javax.validation.constraints.Size;import java.io.Serializable;import java.time.LocalDateTime;import java.util.List;@Getter @Setter @ToString @NoArgsConstructor public class PostDto private Long id; @Size (max=10 ) private String postName; @Size (max=200 ) private String content; private User user; private LocalDateTime createdDate; private LocalDateTime modifiedDate; public Post toEntity () Post post = Post.builder() .id(id) .postName(postName) .content(content) .user(user) .build(); return post; } public PostDto (Post post) this .id = post.getId(); this .postName = post.getPostName(); this .content = post.getContent(); this .createdDate = post.getCreatedDate(); this .modifiedDate = post.getModifiedDate(); this .user = post.getUser(); } }
1 2 3 4 5 6 7 8 9 10 @NoArgsConstructor public class DataFieldInvalidCException extends RuntimeException public DataFieldInvalidCException (String message) super (message); } public DataFieldInvalidCException (List messageList) super ((String)messageList.stream().collect(Collectors.joining("," ))); } }
Auth 구현(Admin,User) 다수 Role 적용 SpringSecurity에서 Role은 Role_Admin, ROLE_USER을 동시에 갖는것을 목표로하였다.
변경한점 User Entity
SpringSecurity에서 권한확인시 UserDetail통해 getAuthorities()가 항상 호출된다. 따라서 저장하는 방법은 String으로 저장하되, getAuthorities() 호출시에는 GrantedAuthority로 구성된 Collection의 구현체를 반환해야한다. 따라서 아래와 같이 구현하였다.
1 2 3 4 5 6 7 8 9 10 11 12 13 14 15 16 17 public class User extends BaseTimeEntity implements UserDetails ... @Column (name = "auth" ) private String auth; @Override public Collection<? extends GrantedAuthority> getAuthorities() { Set<GrantedAuthority> roles = new HashSet<>(); for (String role : auth.split("," )) { roles.add(new SimpleGrantedAuthority(role)); } return roles; } ... }
SignController
signupMap.get()활용시 값이 없을 경우, 값이 들어오지 않았을경우 default값으로 처리
validation을 이용하여 아래와같이 개선하였다.
1 2 3 4 5 6 7 8 9 10 11 12 13 14 15 16 17 18 19 20 21 22 23 24 25 public class SignController ... @PostMapping ("/signup" ) public SingleResult<Long> signup (@RequestBody Map<String, String> signupMap) String email = signupMap.get("email" ); String password = signupMap.get("password" ); String nickname = signupMap.get("nickname" ); String auth = signupMap.get("auth" ); if (auth.isEmpty()) { auth = "ROLE_USER" ; } else { auth = signupMap.get("auth" ); } UserSignupRequestDto userSignupRequestDto = UserSignupRequestDto.builder() .email(email) .password(passwordEncoder.encode(password)) .nickname(nickname) .auth(auth) .build(); Long signupId = userService.signup(userSignupRequestDto); return responseService.getSingleResult(signupId); } ... }
1 2 3 4 5 6 7 8 9 10 11 12 13 14 15 @PostMapping ("/signup" ) public SingleResult<Long> signup (@Validated @RequestBody UserSignupRequestDto requestuserSignupRequestDto, BindingResult bindingResult) if (bindingResult.hasErrors()){ List<String> errors = bindingResult.getAllErrors().stream().map(e->e.getDefaultMessage()).collect(Collectors.toList()); throw new DataFieldInvalidCException(errors); } UserSignupRequestDto userSignupRequestDto = UserSignupRequestDto.builder() .email(requestuserSignupRequestDto.getEmail()) .password(passwordEncoder.encode(requestuserSignupRequestDto.getPassword())) .nickname(requestuserSignupRequestDto.getNickname()) .auth(requestuserSignupRequestDto.getAuth()) .build(); Long signupId = userService.signup(userSignupRequestDto); return responseService.getSingleResult(signupId); }
UserSignupRequestDto
User 저장시 사용하는 UserDto를 반드시 알맞게 수정
@validation 처리
1 2 3 4 5 6 7 8 9 10 11 12 13 14 15 16 17 18 19 20 21 22 23 24 25 26 27 28 29 30 31 32 public class UserSignupRequestDto @NotEmpty @Size (max=30 ) private String email; @NotEmpty @Size (max=30 ) private String password; @Size (max=30 ) private String nickname; @NotEmpty private String auth; @Builder public UserSignupRequestDto (String email, String password, String nickname, String auth) this .email = email; this .password = password; this .nickname = nickname; this .auth = auth; } public User toEntity () return User.builder() .email(email) .password(password) .nickname(nickname) .auth(auth) .build(); } }